
無料Photoshop代替の開発記
選択を再利用する
選択範囲を一度で捨てず、名前付きのチャンネルとして残します。新しいAI人物写真の矩形選択を、保存・読込・マスク・プロジェクト再読込へつなげました。
AI生成の動作例用写真。編集画面と出力画像は実際のPhotoshotで作成しました。
ソースから始める。
点線の内外だけではない
選択範囲は寸法と各画素のアルファ値を持ちます。0と255の間の値によって境界の部分的な選択を残せます。点線は操作の目印であり、境界の全数値を表すものではありません。
selection-tools.tsの追加は最大値、減算は0未満にならない差、交差は最小値です。寸法が違えばエラーにします。操作名だけでなく中間値の組合せ方を確認する必要があります。
選択・チャンネル・マスクの役割
現在の選択は次の編集範囲を限定し、保存チャンネルは後から同じ範囲を読み込む保管先です。レイヤーマスクは一層の見え方を制御します。同じアルファデータでも役割と保持期間が違います。
selection-mask.tsは選択アルファからマスクを作り、既存の有効なマスクがあればdestination-inで結合します。原画像の画素を削除する処理とは別です。無効化や再調整の余地を残すことが非破壊編集につながります。
export type SelectionOperation='replace'|'add'|'subtract'|'intersect';
export function combineSelection(a:PixelSelection|undefined,b:PixelSelection,op:SelectionOperation):PixelSelection{if(!a||op==='replace')return b;if(a.width!==b.width||a.height!==b.height)throw Error('Selection size mismatch.');return {...b,alpha:b.alpha.map((v,i)=>op==='add'?Math.max(a.alpha[i],v):op==='subtract'?Math.max(0,a.alpha[i]-v):Math.min(a.alpha[i],v))};}
export function shapeSelection(w:number,h:number,points:Point[],ellipse=false,feather=0):PixelSelection{const c=surface(w,h),g=c.getContext('2d')!;g.fillStyle='#fff';g.beginPath();if(ellipse&&points.length>=2){const [a,b]=points;g.ellipse((a.x+b.x)/2,(a.y+b.y)/2,Math.abs(b.x-a.x)/2,Math.abs(b.y-a.y)/2,0,0,Math.PI*2);}else{points.forEach((p,i)=>i?g.lineTo(p.x,p.y):g.moveTo(p.x,p.y));g.closePath();}g.fill();const p=g.getImageData(0,0,w,h).data;let s={width:w,height:h,alpha:Array.from({length:w*h},(_,i)=>p[i*4+3])};if(feather)s=modifySelection(s,'feather',feather);return s;}計算の
内側へ。
チャンネル演算とベクトルは別途検証する
channel-operations.tsは色空間別の成分名を選び、合成・不透明度・倍率・オフセットを検査します。加減算には明示的な式があり、結果を範囲内に制限します。保存アルファの作成だけで全演算を検証したとは言えません。
ベクトルパスは座標と曲線構造を保持します。psd-paths.tsはレコード長とアンカー数を検査し、文書寸法に応じて座標を読みます。ピクセルマスクへの変換には解像度と境界の問題が加わります。今回はベクトルマスクの試験ではありません。
12pxのぼかし選択を保存して読込
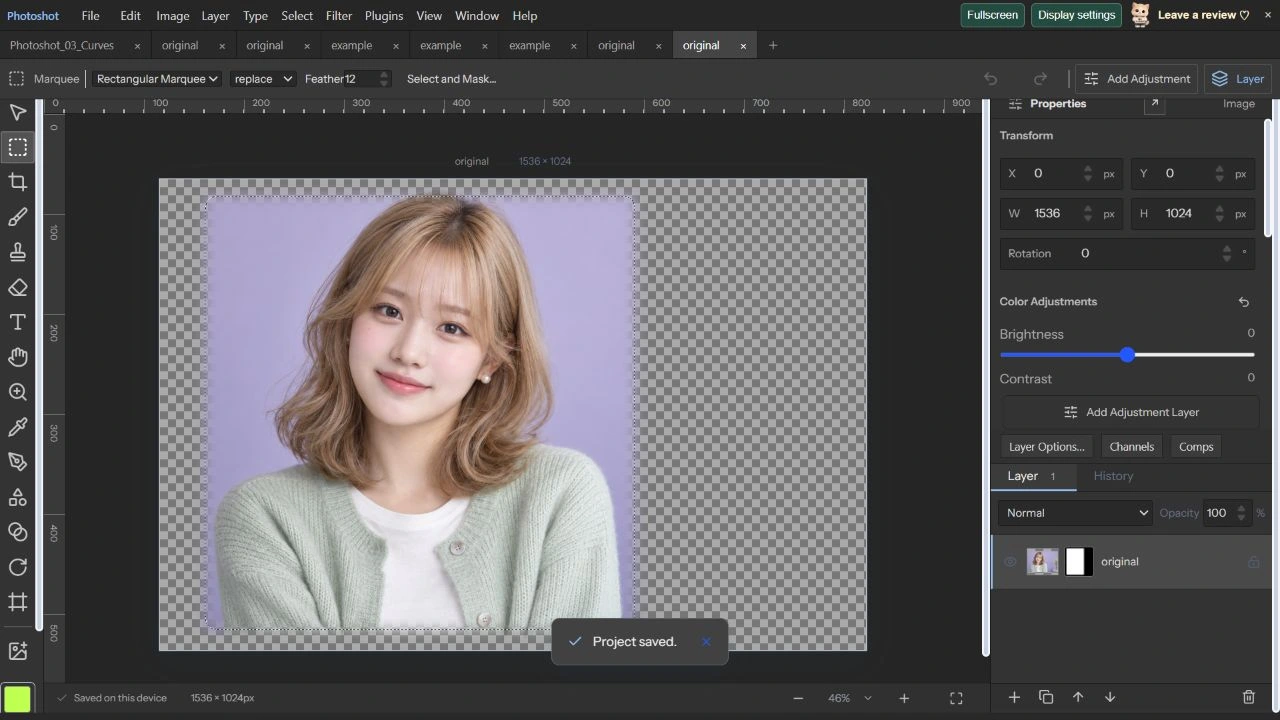
2026年10月22日、1536×1024のAI原画像で人物を含む矩形を選択し、Featherを12pxに設定しました。Save SelectionでPortrait windowとして保存し、選択を解除してからLoad SelectionのNew Selectionで戻しました。
Layer Mask from Selectionを使うと外側が透明になり、境界は柔らかく残りました。チャンネル画面でも白い領域と黒い外側の間に灰色の遷移を確認しました。髪の自動切抜きではなく、矩形選択の再利用例です。
コードを読む。
export function refineSelection(alpha:Uint8Array,w:number,h:number,feather:number){const c=surface(w,h),g=c.getContext('2d')!,im=g.createImageData(w,h);for(let i=0;i<alpha.length;i++){im.data[i*4]=im.data[i*4+1]=im.data[i*4+2]=255;im.data[i*4+3]=alpha[i];}g.putImageData(im,0,0);if(feather>0){const out=surface(w,h),ctx=out.getContext('2d')!;ctx.filter=`blur(${feather}px)`;ctx.drawImage(c,0,0);return out;}return c;}
export function selectionMask(alpha:Uint8Array,w:number,h:number,width:number,height:number,feather:number,existing?:LayerMask):LayerMask{const c=refineSelection(alpha,w,h,feather),g=c.getContext('2d')!;if(existing?.enabled){g.globalCompositeOperation='destination-in';g.drawImage(maskSurface(existing,w,h),0,0);}
const data=g.getImageData(0,0,w,h).data;return{width,height,enabled:true,inverted:false,strokes:[],raster:{width:w,height:h,alpha:Array.from({length:w*h},(_,i)=>data[i*4+3])}};}export function mixChannel(a:number,b:number,o:ChannelMix){
let v=o.blend==='add'?(a+b)/o.scale+o.offset:o.blend==='subtract'?(a-b)/o.scale+o.offset:blendRGB([a/255,a/255,a/255],[b/255,b/255,b/255],o.blend as BlendMode,[0,0,0])[0]*255;
v=Math.max(0,Math.min(255,v));return a*(1-o.opacity)+v*o.opacity;
}
function validateMix(o:ChannelMix){if(!channelBlendNames.includes(o.blend)||!Number.isFinite(o.opacity)||o.opacity<0||o.opacity>1||!Number.isFinite(o.scale)||o.scale<1||o.scale>2||!Number.isFinite(o.offset)||o.offset< -255||o.offset>255)throw Error('Invalid channel blending settings.');}
export const componentNames=(doc:StudioDoc)=>doc.precision?.space==='CMYK'?['Cyan','Magenta','Yellow','Black']:doc.precision?.space==='Lab'?['Lightness','a','b']:doc.precision?.space==='Gray'?['Gray']:['Red','Green','Blue'];export function readPsdPaths(bytes:Uint8Array,width:number,height:number):WorkPath[]{
const output:WorkPath[]=[];for(const block of resourceBlocks(bytes)){if(!(block.id>=2000&&block.id<=2997||block.id===1025))continue;if(output.length>=100)throw Error('PSD contains more than 100 saved paths.');const data=block.data;if(data.length%26)throw Error('Invalid Photoshop path resource length.');const v=new DataView(data.buffer,data.byteOffset,data.byteLength),paths:PathShape[]=[];let path:PathShape|undefined,count=0;
for(let at=0;at<data.length;at+=26){const selector=v.getUint16(at);if(selector===0||selector===3){if(path&&path.knots.length!==count)throw Error('Incomplete Photoshop path.');count=v.getUint16(at+2);path={open:selector===3,operation:operations[v.getInt16(at+4)]??'exclude',fillRule:v.getUint16(at+6)===2?'non-zero':'even-odd',knots:[]};paths.push(path);}else if([1,2,4,5].includes(selector)){if(!path||path.knots.length>=count)throw Error('Unexpected Photoshop path anchor.');const points:number[]=[];for(const j of [2,1,0])points.push(v.getInt32(at+6+j*8)/16777216*width,v.getInt32(at+2+j*8)/16777216*height);path.knots.push({linked:selector===1||selector===4,points});}else if(![6,7,8].includes(selector))throw Error('Unsupported Photoshop path record.');}
if(path&&path.knots.length!==count)throw Error('Incomplete Photoshop path.');const nameBytes=bytes.subarray(block.start+7,block.start+7+bytes[block.start+6]);let name:string;try{name=new TextDecoder('utf-8',{fatal:true}).decode(nameBytes);}catch{try{name=new TextDecoder('euc-kr',{fatal:true}).decode(nameBytes);}catch{name=new TextDecoder('windows-1252').decode(nameBytes);}}output.push({id:uid(),name:name||'Work Path',paths});}
validatePaths(output);return output;エディターで見る。
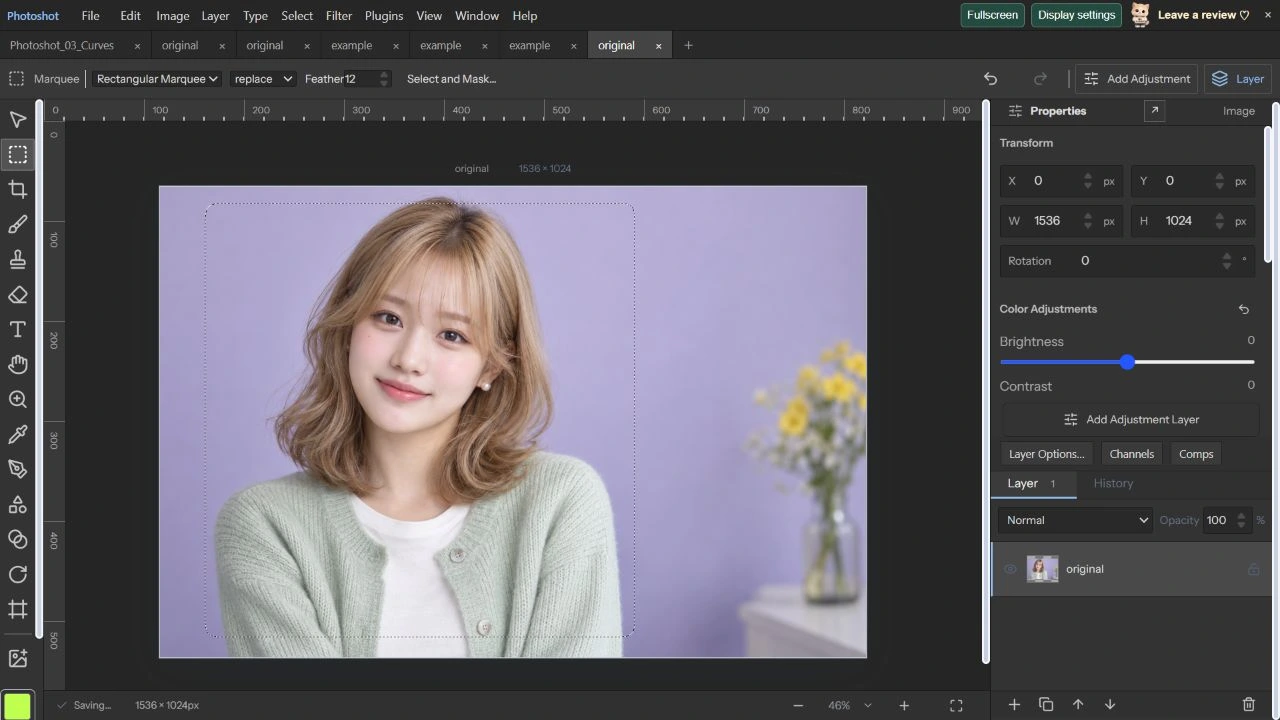
再読込後のアルファも比較する
.layerstudioを保存して読み直し、画面でPortrait windowを確認して再保存しました。保存選択とレイヤーマスクのデータはそれぞれ完全に一致しました。マスクには0~255の256段階がありました。
既存spot-channels-renderとspot-channels-native報告には、それぞれ指定の8/16ビットPSD/PSB八例の通過記録があります。今回新たに実行した特色やAdobeの試験ではありません。人物はAI生成、作業画面は実際のキャプチャーです。23回は文字・テキストパス・OpenTypeを扱います。
原画像とマスク再読込。
AI生成の動作例用写真。編集画面と出力画像は実際のPhotoshotで作成しました。